- 一、环境搭建
- 1. Node.js、Npm、Cnpm
- 2. Vue-cli
- 二、Vue实例
- 1. 目录结构
- 2. 生命周期
- 3.过滤器
- 4.计算属性
- 5.监听器
- 6.方法
- 三、组件
- 1. 组件介绍
- 2. 使用Element UI组件库
- 3. 创建自定义组件
- 四、Router路由
- 1. Router配置
- 2. router-link router-view
- 3. keep-alive
- 4. 导航守卫
- 五、方法封装
- 1. 全局变量
- 2. 弹窗封装
- 3. 浅拷贝与深拷贝
- 4. axios封装
- 六、Webpack
- 1. build/build.js
- 2. build/check-version.js
- 3. build/utils.js
- 4. build/vue-loader.conf.js
- 5. build/webpack.base.conf.js
- 6. build/webpack.dev.conf.js
- 7. build/webpack.prod.conf.js
- 8. config/dev.env.js
- 9. config/index.js
- 10. config/prod.env.js
- 11. 配置代理解决跨域问题
Vue学习笔记#
@TOC
一、环境搭建#
1. Node.js、Npm、Cnpm#
Npm依赖于Node.js,直接下载安装,并配置环境变量 由于个人比较习惯使用 shift+右键 唤起powershell来执行命令,默认powershell不允许执行脚本文件,需要解除此安全策略
set-ExecutionPolicy RemoteSignedNpm默认安装位置在C盘,修改默认路径与查看Npm配置
npm config set prefix "E:/Npm"   # 配置全局安装目录
npm config set cache "E:/Npm/npm_cache"   # 配置缓存目录
npm config ls   # 查看配置
由于一些已知原因国外网络较慢,于是选择使用淘宝的cnpm进行构建
npm install cnpm -g
cnpm install vue
cnpm install --global vue-cli
2. Vue-cli#
直接构建一个基于webpack的项目,需要进行一些配置
> vue init webpack project-name

? Project name project-name
? Project description A Vue.js project
? Author Czy <651525974@qq.com>
? Vue build standalone
? Install vue-router? Yes
? Use ESLint to lint your code? No
? Set up unit tests No
? Setup e2e tests with Nightwatch? No
? Should we run `npm install` for you after the project has been created? (recommended) no

   vue-cli · Generated "project-name".

# Project initialization finished!
# ========================
我选择了手动安装依赖,但是由于依赖生成的 node_modules 动辄百兆,并且若是出现问题,需要重新构建,由于文件过多,删除时相当慢,而且个人更倾向于像 Maven 一样共用依赖,于是使用 mklink 做目录链接 首先复制 package.json 到某目录,在此执行安装 cnpm i,会自动生成 node_modules ,此后在项目文件夹执行mklink即可,也可以先建好目录链接再执行 cnpm i (i即install缩写)
Directory: D:\Project\Library\Modules
Mode                LastWriteTime         Length Name
----                -------------         ------ ----
d-----         20/01/09     09:21                node_modules
-a----         20/01/04     14:09             62 mklink.md
-a----         20/01/04     14:07           2707 package.json

PS D:\Project\Library\Modules> npm i
在 powershell 中不能执行 mklink ,需要使用CMD进行mklink,然后运行 npm run dev 即可正常启动项目
C:\Users\Czy\Desktop\project-name>mklink /J node_modules D:\Project\Library\Modules\node_modules
Junction created for node_modules <<===>> D:\Project\Library\Modules\node_modules

C:\Users\Czy\Desktop\project-name>npm run dev
> project-name@1.0.0 dev C:\Users\Czy\Desktop\project-name
> webpack-dev-server --inline --progress --config build/webpack.dev.conf.js
 10 13 13 13 13% building modules 33/37 modules 4 active ...ct-name\src\components\HelloWorld.vue{ parser: "babylon" } is deprecated; we now treat it as {  14 14 95% emitting
 DONE  Compiled successfully in 14788ms                                                                       1:09:13 PM
I Your application is running here: http://localhost:8080二、Vue实例#
1. 目录结构#
vue-cli
├── build/ # Webpack 配置目录
├── dist/ # build 生成的生产环境下的项目
├── config/ # Vue基本配置文件,可以设置监听端口,打包输出等
├── node_modules/ # 依赖包,即 cnpm i生成的目录
├── src/ # 源码目录(构建应用专注于此目录)
│ ├── assets/ # 放置需要经由 Webpack 处理的静态文件,通常为样式类文件,如CSS,SASS以及一些外部的JS
│ ├── components/ # 组件目录
│ ├── filters/ # 过滤器
│ ├── store/ # 状态管理
│ ├── routes/ # 路由,此处配置项目路由
│ ├── utils/ # 工具类
│ ├── views/ # 路由页面组件
│ ├── App.vue # 根组件
│ └── main.js # 入口文件
├── index.html # 主页,打开页面后会被Vue注入
├── static/ # 放置无需经由 Webpack 处理的静态文件,通常放置图片类资源
├── .babelrc # Babel 转码配置
├── .editorconfig # 代码格式
├── .eslintignore # ESLint 忽略
├── .eslintrc # ESLint 配置
├── .gitignore # Git 忽略
├── package.json # 本项目的配置信息,启动方式
├── package-lock.json # 记录当前状态下实际安装的各个npm package的具体来源和版本号
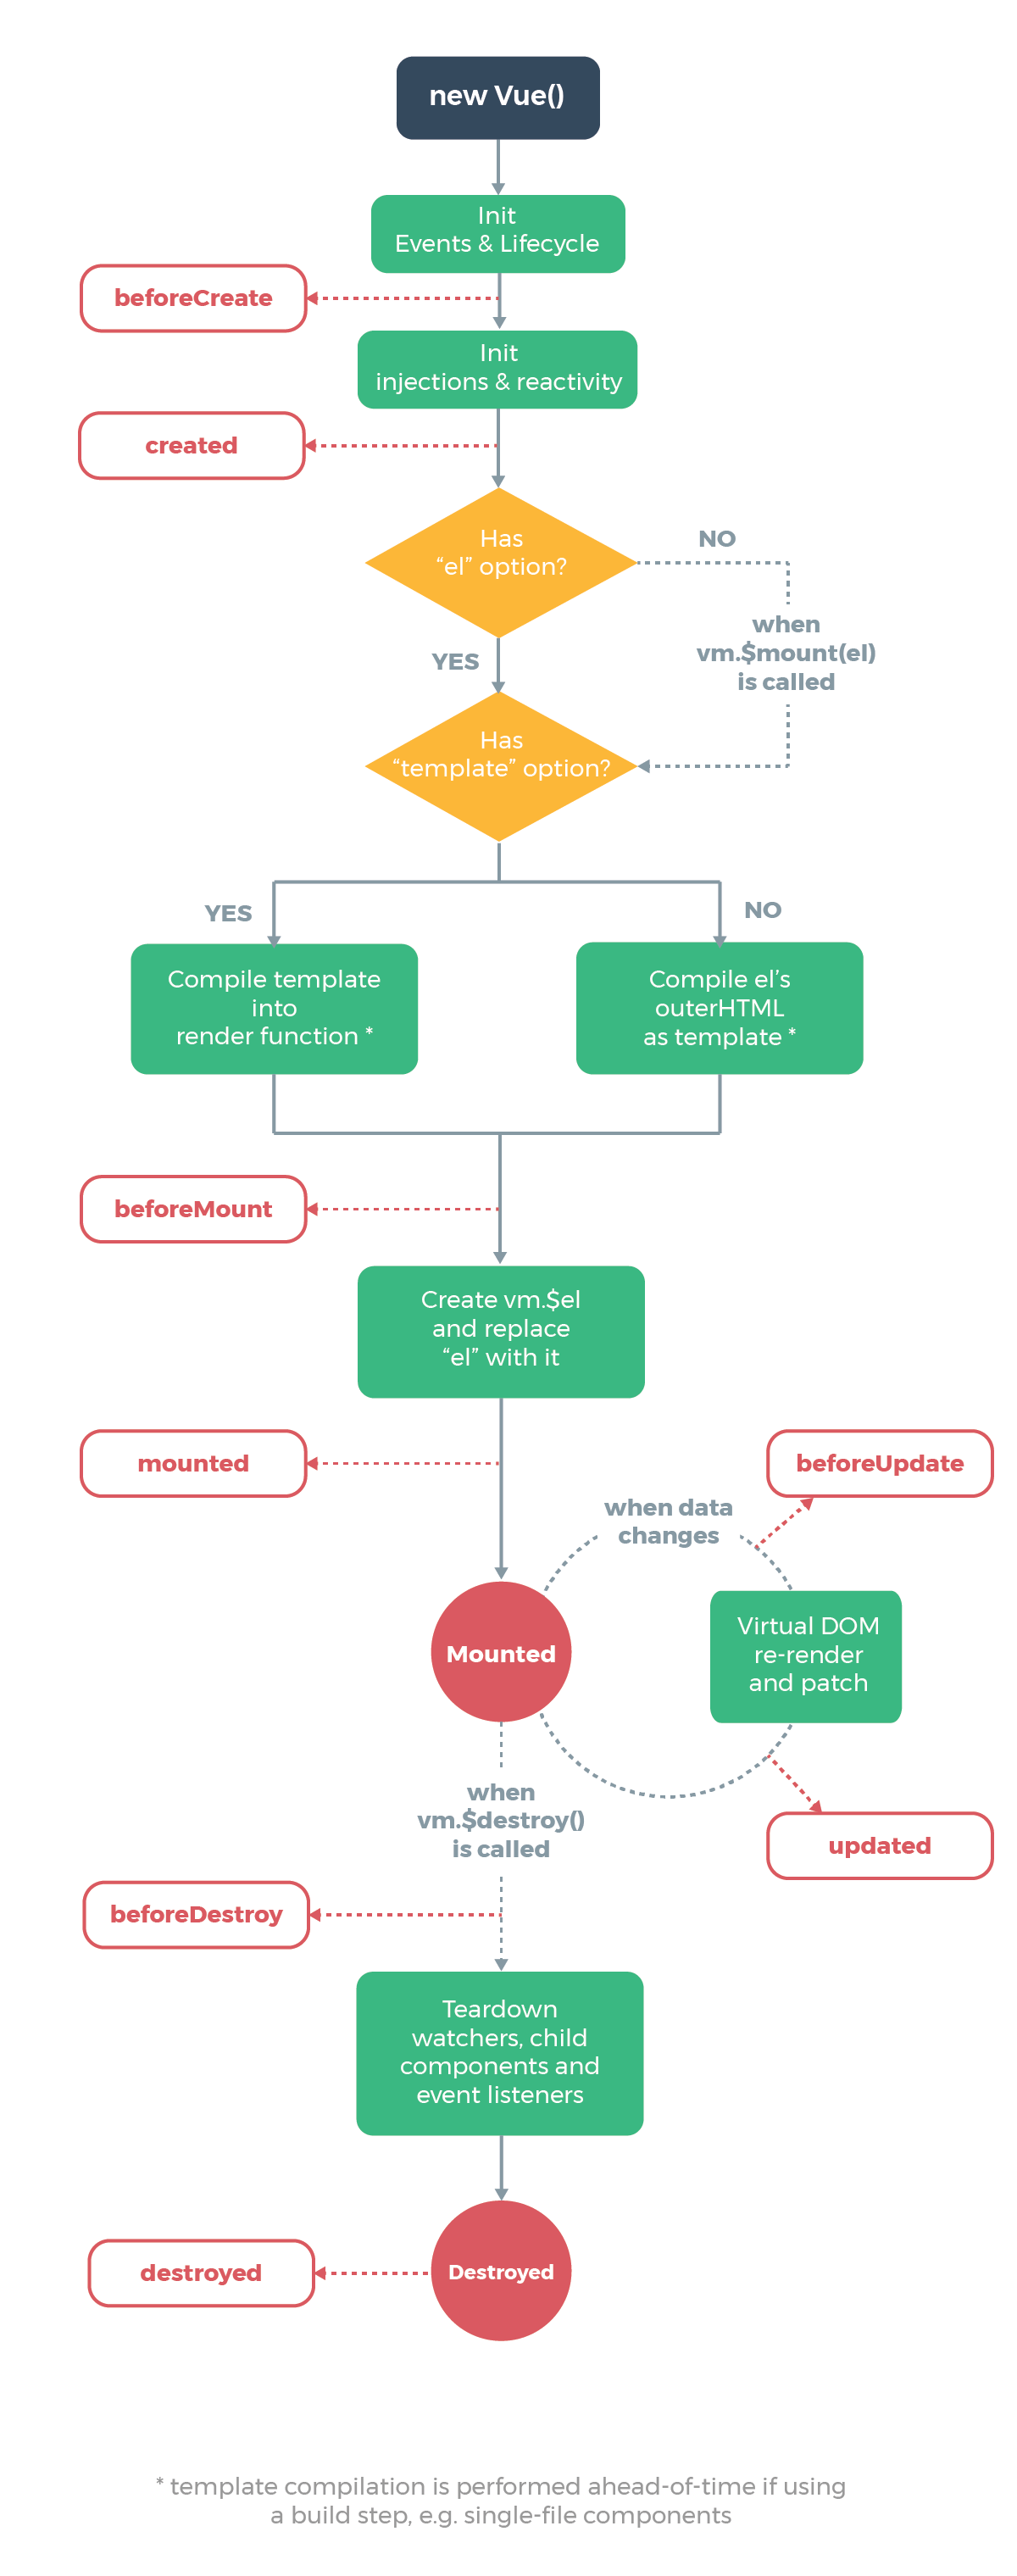
└── README.md # 项目说明2. 生命周期#
3.过滤器#
过滤器可将数据进行过滤,例如可以在打印表格中将1显示为OK
//模板中使用
{{status | statusFilter}} //使用{{ 数据 | 过滤器定义}} 支持链式 {{ 数据 | 过滤器定义1 |  过滤器定义2}}

//可以在style中引用
:style="status | colorFilter"

//定义过滤器
export default {
    filters:{
      statusFilter: function(val){
        switch (val){
          case true : return "OK";
          case false : return "Block";
        }
        return "待获取";
      },
      colorFilter: function(val){
        switch (val){
          case true : return {'color':'green'};
          case false : return {'color':'red'};
        }
        return {'color':'black'};
      },
    }
}
全局过滤器定义,注意当全局过滤器与局部过滤器同名时会加载局部过滤器
Vue.filter('dataFormat', (input, pattern = '') => {});4.计算属性#
模板内的表达式非常便利,但是设计它们的初衷是用于简单运算的。在模板中放入太多的逻辑会让模板过重且难以维护。计算属性的结果会被缓存,除非依赖的响应式属性变化才会重新计算,computed擅长处理的场景:一个数据受多个数据影响
模板: {{message}} 计算属性: {{reversedMessage }}

export default {
     computed: {
        reversedMessage: function () {
          return this.message.split('').reverse().join('')
        }
      }
}5.监听器#
监听数据的改变,一旦数据改变则触发监听器,watch擅长处理的场景:一个数据影响多个数据
export default {
    watch:{
      radio: function(newV,oldV){
        console.log(`监听radio的值改变: ${oldV} -> ${newV}`);
      }
    },
}6.方法#
响应@click触发事件
<div  @click='search'>点击</div >

export default {
    methods: {
      clickHandle: function(e) {
        console.log("我被触发了",e);
      }
}三、组件#
1. 组件介绍#
Vue-cli默认是构建单页应用,使用Url的锚来确定组件引用,组件是可复用的 Vue 实例, 如果网页中的某一个部分需要在多个场景中使用,那么我们可以将其抽出为一个组件进行复用。组件大大提高了代码的复用率。
2. 使用Element UI组件库#
安装组件库
npm i element-ui -S在main.js中引入组件库
import ElementUI from 'element-ui';
import 'element-ui/lib/theme-chalk/index.css';
Vue.use(ElementUI);
上述是全局引入,但是由于上边说了Vue是单页应用,也就是说明打包起来的项目其实就是一页,所有需要的资源将全部被打包,所以我个人更倾向于引入部分组件,当然也可以在单页cdn引入全部的组件,这样就不会打包Element UI的组件进去了,现在使用本地资源按需引入,则需要借助 babel-plugin-component ,安装依赖,运行如果提示某文件夹缺少文件则添加文件,如果提示缺少es2015则也要安装,另外更改文件.babelrc
cnpm i babel-plugin-component -D.babelrc
{
  "presets": [
    ["env", {
      "modules": false,
      "targets": {
        "browsers": ["> 1%", "last 2 versions", "not ie <= 8"]
      }
    }],
    "stage-2",
    ["es2015", { "modules": false }]
  ],
  "plugins": ["transform-vue-jsx", "transform-runtime",[
      "component",
      {
        "libraryName": "element-ui",
        "styleLibraryName": "theme-chalk"
      }
    ]]
}
main.js
import { Menu,MenuItem } from 'element-ui';
import 'element-ui/lib/theme-chalk/index.css';
Vue.use(Menu)
Vue.use(MenuItem)
3. 创建自定义组件#
像这些组件库一样在组件内类似作为元素使用,需要一个.vue文件作为创建的自定义组件,以及index.js暴露接口
index.js
import layout from './layout';
/* istanbul ignore next */
layout.install = function(Vue) {
  Vue.component(layout.name, layout);
};
export default layout;
再在main.js引入并挂载即可
import layout from '@/components/common/layout';
Vue.use(layout)四、Router路由#
1. Router配置#
//以此配置介绍

import Vue from 'vue'
import Router from 'vue-router'
//引入页面组件
import Index from "@/components/login/Index.vue"
import ManagerIndex from "@/components/manager/Index.vue"
//挂载Router
Vue.use(Router)

export default new Router({
  routes: [
    {
      path: '/',                        // 页面路径 /#/
      name: "Index",                    // 页面命名,当跳转页面需要传参时就需要使用name
      component: Index,                 // 加载组件
    },
    {
      path: '/ManagerIndex',
      name: "ManagerIndex",
      component: ManagerIndex,
      meta:{                             // 一些配置信息
        auth: true                       // 此处配置此页面需要鉴权,需配合router.beforeEach()使用
      },
      children: [                        // 此组件的子组件
        {
          path: 'OverView',              // 页面路径/#/ManagerIndex/OverView
          name: "OverView",
          component: OverView
        }
        ]
    }
  ]
})
2. router-link router-view#
router-link有一个to属性,即为跳转锚点用,router-view则是根据锚点来加载Router定义的组件的容器
<router-link :to="/">直接转到</router-link>
<router-link :to="{ path: '/path', query: { id: 123 }}">query参数</router-link>
<router-link :to="{ name: 'routername', params: { id: 123 }}">param参数,使用name,在path中标明占位符:id</router-link>
<router-view></router-view>
router-link为声明式跳转,Router提供了编程式跳转
this.$router.push({ name: 'OverView'})3. keep-alive#
当 router-link 进行跳转时,组件会动态的进行创建销毁,如果想保持组件状态,可使用<keep-alive/>,注意这样则不会触发组件生命周期了
<keep-alive><router-view></router-view></keep-alive>4. 导航守卫#
在注册路由时在meat中声明了一个auth用来鉴权,需要配合 router.beforeEach() 以及 全局变量 使用,在main.js声明此方法,进行导航守卫,注意务必调用next()方法,否则不会执行跳转
router.beforeEach((to, from, next) => {
  if (to.meta.auth && !Vue.prototype.$globalData.user) {
    next({
      path: "/"
    })
  } else {
    next();
  }
})五、方法封装#
1. 全局变量#
在dispose.js中声明并暴露出口
const $globalData = {
  user: 0,
  url: "http://dev.touchczy.top/",
  header: {
    'content-type': 'application/x-www-form-urlencoded'
  }
}
export default {
  $globalData: $globalData
}
在main.js中引入并拓展Vue原型
import dispose from '@/vector/dispose'
Vue.prototype.$globalData = dispose.$globalData;
2. 弹窗封装#
在dispose.js中引入组件,封装加载与弹窗,并暴露出口
import {
  Message,
  Loading
} from 'element-ui'

function startLoading(options) {
  if (!options.load) return true;
  var loadingInstance = Loading.service({
    lock: true,
    text: 'loading...'
  })
  return loadingInstance;
}

function endLoading(options, loadingInstance) {
  if (!options.load) return true;
  loadingInstance.close();
}

function toast(msg, type = 'error') {
  Message({
    message: msg,
    type: type,
    duration: 2000,
    center: true
  })
}
export default {
  $toast: toast
}

main.js
import dispose from '@/vector/dispose'
Vue.prototype.$toast = dispose.$toast;
3. 浅拷贝与深拷贝#
function extend() {
  var aLength = arguments.length;
  var options = arguments[0];
  var target = {};
  var copy;
  var i = 1;
  if (typeof options === "boolean" && options === true) {
    //深拷贝 (仅递归处理对象)
    for (; i < aLength; i++) {
      if ((options = arguments[i]) != null) {
        if (typeof options !== 'object') {
          return options;
        }
        for (var name in options) {
          copy = options[name];
          if (target === copy) {
            continue;
          }
          target[name] = this.extend(true, options[name]);
        }
      }
    }
  } else {
    //浅拷贝
    target = options;
    if (aLength === i) {
      target = this;
      i--;
    } //如果是只有一个参数,拓展功能 如果两个以上参数,将后续对象加入到第一个对象
    for (; i < aLength; i++) {
      options = arguments[i];
      for (var name in options) {
        target[name] = options[name];
      }
    }
  }
  return target;
}
4. axios封装#
由于刚开始学习Vue,对于网络请求还是更倾向于使用 success fail complete 来写 封装了请求时加载Loading,请求失败弹窗,并且返回promise对象可以继续使用then等 当发起post请求时使用{ 'content-type': 'application/x-www-form-urlencoded'}作为请求头,在transformRequest将json形请求转化为表单请求
function ajax(requestInfo) {
  var options = {
    load: true,
    url: "",
    method: "GET",
    data: {},
    param: {},
    success: () => {},
    fail: function() { this.completeLoad = () => {toast("服务器错误", 'error');}
    },
    complete: () => {},
    completeLoad: () => {}
  };
  extend(options, requestInfo);
  let loadingInstance = startLoading(options);
  return axios.request({
    url: options.url,
    data: options.data,
    params: options.param,
    method: options.method,
    headers: $globalData.header,
    transformRequest: [function(data) {
      let ret = ''
      for (let it in data) ret += encodeURIComponent(it) + '=' + encodeURIComponent(data[it]) + '&'
      return ret
    }]
  }).then(function(res) {
    try {
      options.success(res);
    } catch (e) {
      options.completeLoad = () => {
        toast("PARSE ERROR");
      }
      console.warn(e);
    }
  }).catch(function(res) {
    options.fail(res);
  }).then(function(res) {
    endLoading(options, loadingInstance);
    try {
      options.complete(res);
    } catch (e) {
      console.warn(e);
    }
    options.completeLoad(res);
  })
}

export default {
  $ajax: ajax
}
main.js
import dispose from '@/vector/dispose'
Vue.prototype.$ajax = dispose.$ajax;
由于测试必须处理跨域请求,并且需要使用cookies时,首先在声明 axios.defaults.withCredentials = true ,此时在后端就不能将Access-Control-Allow-Origin设置为*了 axios
axios.defaults.withCredentials = truePHP
header('Content-Type: text/html;charset=utf-8');
header('Access-Control-Allow-Origin:http://localhost:8080'); // 允许网址请求
header('Access-Control-Allow-Methods:POST,GET,OPTIONS,DELETE'); // 允许请求的类型
header('Access-Control-Allow-Credentials: true'); // 设置是否允许发送 cookies
header('Access-Control-Allow-Headers: Content-Type,Content-Length,Accept-Encoding,X-Requested-with, Origin'); // 设置允许自定义请求头的字段六、Webpack#
1. build/build.js#
// 构建生产版本 node build/build.js
require('./check-versions')()   //check-versions 调用检查版本的文件 并直接调用该函数
process.env.NODE_ENV = 'production'   // 注册到window的全局变量,可以用以区分生产环境和开发环境,此为生产环境
const ora = require('ora')   // 终端显示的转轮loading
const rm = require('rimraf')   // node环境下rm -rf的命令库
const path = require('path')   // 文件路径处理库
const chalk = require('chalk')   // 终端显示带颜色的文字
const webpack = require('webpack')   // webpack
const config = require('../config')   // 引入配置
const webpackConfig = require('./webpack.prod.conf')   // 引入生产环境下配置

const spinner = ora('building for production...')   // 终端显示正在构建
spinner.start()   // 终端显示loading

rm(path.join(config.build.assetsRoot, config.build.assetsSubDirectory), err => {   // 删除已编译文件,即dist文件夹
  if (err) throw err
  webpack(webpackConfig, (err, stats) => {   //在删除完成的回调函数中开始编译
    spinner.stop()   // 终端终止loading
    if (err) throw err
    process.stdout.write(stats.toString({   // 在编译完成的回调函数中,在终端输出编译的文件
      colors: true,
      modules: false,
      children: false, // If you are using ts-loader, setting this to true will make TypeScript errors show up during build.
      chunks: false,
      chunkModules: false
    }) + '\n\n')
    /* ... */ // 以下为编译结果的输出
  })
})
2. build/check-version.js#
const chalk = require('chalk')   // 终端显示带颜色的文字
const semver = require('semver') // 对版本进行检查
const packageConfig = require('../package.json') // 读取项目配置文件
const shell = require('shelljs') // shell

function exec (cmd) {   //返回通过child_process模块的新建子进程,执行 Unix 系统命令后转成没有空格的字符串
  return require('child_process').execSync(cmd).toString().trim()
}

const versionRequirements = [
  {
    name: 'node',
    currentVersion: semver.clean(process.version),   // 使用semver格式化版本
    versionRequirement: packageConfig.engines.node   // 获取package.json中设置的node版本
  }
]

if (shell.which('npm')) {
  versionRequirements.push({
    name: 'npm',
    currentVersion: exec('npm --version'),   // 调用npm --version命令,并且把参数返回给exec函数,从而获取纯净的版本号
    versionRequirement: packageConfig.engines.npm
  })
}

module.exports = function () {
  /* ... */   //警告或者错误提示
}
3. build/utils.js#
// 处理css
const path = require('path')
const config = require('../config')
const ExtractTextPlugin = require('extract-text-webpack-plugin')
const packageConfig = require('../package.json')

exports.assetsPath = function (_path) {   //导出文件的位置,根据环境判断开发环境和生产环境,为config文件中index.js文件中定义的build.assetsSubDirectory或dev.assetsSubDirectory
  const assetsSubDirectory = process.env.NODE_ENV === 'production'
    ? config.build.assetsSubDirectory
    : config.dev.assetsSubDirectory
  return path.posix.join(assetsSubDirectory, _path) //path 模块提供了一些用于处理文件路径的工具
}

exports.cssLoaders = function (options) {
  options = options || {}
  const cssLoader = { //使用了css-loader和postcssLoader,通过options.usePostCSS属性来判断是否使用postcssLoader中压缩等方法
    loader: 'css-loader',
    options: {
      sourceMap: options.sourceMap
    }
  }

  const postcssLoader = {
    loader: 'postcss-loader',
    options: {
      sourceMap: options.sourceMap
    }
  }
  function generateLoaders (loader, loaderOptions) {
    const loaders = options.usePostCSS ? [cssLoader, postcssLoader] : [cssLoader]
    if (loader) {
      loaders.push({
        loader: loader + '-loader',
        options: Object.assign({}, loaderOptions, {   //Object.assign是es6语法的浅拷贝,后两者合并后复制完成赋值
          sourceMap: options.sourceMap
        })
      })
    }

    if (options.extract) {
      return ExtractTextPlugin.extract({   //ExtractTextPlugin可提取出文本,代表首先使用上面处理的loaders,当未能正确引入时使用vue-style-loader
        use: loaders,
        fallback: 'vue-style-loader'
      })
    } else {
      return ['vue-style-loader'].concat(loaders)   //返回vue-style-loader连接loaders的最终值
    }
  }
  return {
    css: generateLoaders(),//需要css-loader 和 vue-style-loader
    postcss: generateLoaders(),//需要css-loader和postcssLoader  和 vue-style-loader
    less: generateLoaders('less'),//需要less-loader 和 vue-style-loader
    sass: generateLoaders('sass', { indentedSyntax: true }),//需要sass-loader 和 vue-style-loader
    scss: generateLoaders('sass'),//需要sass-loader 和 vue-style-loader
    stylus: generateLoaders('stylus'),//需要stylus-loader 和 vue-style-loader
    styl: generateLoaders('stylus')//需要stylus-loader 和 vue-style-loader
  }
}
exports.styleLoaders = function (options) {
  const output = []
  const loaders = exports.cssLoaders(options)
  for (const extension in loaders) {  //将各种css,less,sass等综合在一起得出结果输出output
    const loader = loaders[extension]
    output.push({
      test: new RegExp('\\.' + extension + '$'),
      use: loader
    })
  }

  return output
}

exports.createNotifierCallback = () => {
  const notifier = require('node-notifier') //发送跨平台通知系统
  return (severity, errors) => {
    if (severity !== 'error') return
    const error = errors[0]
    const filename = error.file && error.file.split('!').pop()
    notifier.notify({   //当报错时输出错误信息的标题,错误信息详情,副标题以及图标
      title: packageConfig.name,
      message: severity + ': ' + error.name,
      subtitle: filename || '',
      icon: path.join(__dirname, 'logo.png')   // 用于连接路径,会正确使用当前系统的路径分隔符,Unix系统是"/",Windows系统是""
    })
  }
}
4. build/vue-loader.conf.js#
// 处理.vue文件,解析这个文件中的每个语言块(template、script、style),转换成js可用的js模块
const utils = require('./utils')
const config = require('../config')
const isProduction = process.env.NODE_ENV === 'production'
const sourceMapEnabled = isProduction
  ? config.build.productionSourceMap
  : config.dev.cssSourceMap

module.exports = {   // 处理项目中的css文件,生产环境和测试环境默认是打开sourceMap,而extract中的提取样式到单独文件只有在生产环境中才需要
  loaders: utils.cssLoaders({
    sourceMap: sourceMapEnabled,
    extract: isProduction
  }),
  cssSourceMap: sourceMapEnabled,
  cacheBusting: config.dev.cacheBusting,
  transformToRequire: {   // 在模板编译过程中,编译器可以将某些属性,如 src 路径,转换为require调用,以便目标资源可以由 webpack 处理
    video: ['src', 'poster'],
    source: 'src',
    img: 'src',
    image: 'xlink:href'
  }
}
5. build/webpack.base.conf.js#
// 开发和生产共同使用提出来的基础配置文件,主要实现配制入口,配置输出环境,配置模块resolve和插件等
'use strict'
const path = require('path')
const utils = require('./utils')
const config = require('../config')
const vueLoaderConfig = require('./vue-loader.conf')

function resolve (dir) {   // 拼接出绝对路径
  return path.join(__dirname, '..', dir)
}

module.exports = {
  context: path.resolve(__dirname, '../'),
  entry: {   // 入口文件,可以有多个入口,也可只有一个,默认为单页面所以只有app一个入口
    app: './src/main.js'
  },
  output: {    //配置出口,默认是/dist作为目标文件夹的路径
    path: config.build.assetsRoot,   // 路径
    filename: '[name].js',   // 输出文件名
    publicPath: process.env.NODE_ENV === 'production'
      ? config.build.assetsPublicPath
      : config.dev.assetsPublicPath
  },
  resolve: {
    extensions: ['.js', '.vue', '.json'],  // 自动的扩展后缀,比如一个js文件,则引用时书写可不要写.js
    alias: {
      'vue$': 'vue/dist/vue.esm.js',
      '@': resolve('src'),   // @ 即为 /src
    }
  },
  module: {   // 使用插件配置相应文件的处理方法
    rules: [{
        test: /\.vue$/,
        loader: 'vue-loader',   // 使用vue-loader将vue文件转化成js的模块
        options: vueLoaderConfig
      },{
        test: /\.js$/,
        loader: 'babel-loader',   // js文件需要通过babel-loader进行编译成es5文件以及压缩等操作
        include: [resolve('src'), resolve('test'), resolve('node_modules/webpack-dev-server/client')]
      },{
        test: /\.(png|jpe?g|gif|svg)(\?.*)?$/,
        loader: 'url-loader',   // 图片、音像、字体都使用url-loader进行处理,超过10000会编译成base64
        options: {
          limit: 10000,
          name: utils.assetsPath('img/[name].[hash:7].[ext]')
        }
      },{
        test: /\.(mp4|webm|ogg|mp3|wav|flac|aac)(\?.*)?$/,
        loader: 'url-loader',
        options: {
          limit: 10000,
          name: utils.assetsPath('media/[name].[hash:7].[ext]')
        }
      },{
        test: /\.(woff2?|eot|ttf|otf)(\?.*)?$/,
        loader: 'url-loader',
        options: {
          limit: 10000,
          name: utils.assetsPath('fonts/[name].[hash:7].[ext]')
        }
      }
    ]
  },
  node: {   //以下选项是Node.js全局变量或模块,这里主要是防止webpack注入一些Node.js的东西到vue中
    setImmediate: false,
    dgram: 'empty',
    fs: 'empty',
    net: 'empty',
    tls: 'empty',
    child_process: 'empty'
  }
}
6. build/webpack.dev.conf.js#
// 开发环境的wepack相关配置
const utils = require('./utils')
const webpack = require('webpack')
const config = require('../config')
const merge = require('webpack-merge')   // 通过webpack-merge实现webpack.dev.conf.js对wepack.base.config.js的继承
const path = require('path')
const baseWebpackConfig = require('./webpack.base.conf')
const CopyWebpackPlugin = require('copy-webpack-plugin')
const HtmlWebpackPlugin = require('html-webpack-plugin')
const FriendlyErrorsPlugin = require('friendly-errors-webpack-plugin')   // 美化webpack的错误信息和日志的插件
const portfinder = require('portfinder')   // 查看空闲端口位置,默认情况下搜索8000这个端口

const HOST = process.env.HOST   //processs为node的一个全局对象获取当前程序的环境变量,即HOST
const PORT = process.env.PORT && Number(process.env.PORT)

const devWebpackConfig = merge(baseWebpackConfig, {
  module: {
    rules: utils.styleLoaders({ sourceMap: config.dev.cssSourceMap, usePostCSS: true })   // 规则是工具utils中处理出来的styleLoaders,生成了css,less,postcss等规则
  },
  devtool: config.dev.devtool,   // 增强调试

  devServer: {   // 此处的配置都是在config的index.js中设定好了
    clientLogLevel: 'warning',
    historyApiFallback: {   // 当使用 HTML5 History API 时,任意的 404 响应都可能需要被替代为 index.html
      rewrites: [
        { from: /.*/, to: path.posix.join(config.dev.assetsPublicPath, 'index.html') },
      ],
    },
    hot: true,   // 热加载
    contentBase: false,
    compress: true,   // 压缩
    host: HOST || config.dev.host,
    port: PORT || config.dev.port,
    open: config.dev.autoOpenBrowser,   // 调试时自动打开浏览器
    overlay: config.dev.errorOverlay
      ? { warnings: false, errors: true }
      : false,
    publicPath: config.dev.assetsPublicPath,
    proxy: config.dev.proxyTable,   // 接口代理
    quiet: true,   // 控制台是否禁止打印警告和错误,若用FriendlyErrorsPlugin 此处为 true
    watchOptions: {
      poll: config.dev.poll,   // 文件系统检测改动
    }
  },
  plugins: [
    new webpack.DefinePlugin({
      'process.env': require('../config/dev.env')
    }),
    new webpack.HotModuleReplacementPlugin(),   // 模块热替换插件,修改模块时不需要刷新页面
    new webpack.NamedModulesPlugin(),   // 显示文件的正确名字
    new webpack.NoEmitOnErrorsPlugin(),   // 当webpack编译错误的时候,来中端打包进程,防止错误代码打包到文件中
    new HtmlWebpackPlugin({   // 该插件可自动生成一个 html5 文件或使用模板文件将编译好的代码注入进去
      filename: 'index.html',
      template: 'index.html',
      inject: true
    }),
    new CopyWebpackPlugin([   // 复制插件
      {
        from: path.resolve(__dirname, '../static'),
        to: config.dev.assetsSubDirectory,
        ignore: ['.*']
      }
    ])
  ]
})

module.exports = new Promise((resolve, reject) => {
  portfinder.basePort = process.env.PORT || config.dev.port
  portfinder.getPort((err, port) => {   // 查找端口号
    if (err) {
      reject(err)
    } else {   // 端口被占用时就重新设置evn和devServer的端口
      process.env.PORT = port
      devWebpackConfig.devServer.port = port
      devWebpackConfig.plugins.push(new FriendlyErrorsPlugin({
        compilationSuccessInfo: {
          messages: [`Your application is running here: http://${devWebpackConfig.devServer.host}:${port}`],
        },
        onErrors: config.dev.notifyOnErrors
        ? utils.createNotifierCallback()
        : undefined
      }))
      resolve(devWebpackConfig)
    }
  })
})
7. build/webpack.prod.conf.js#
// 生产环境的wepack相关配置文件
const path = require('path')
const utils = require('./utils')
const webpack = require('webpack')
const config = require('../config')
const merge = require('webpack-merge')   // webpack 配置合并插件
const baseWebpackConfig = require('./webpack.base.conf')   // webpack 基本配置
const CopyWebpackPlugin = require('copy-webpack-plugin')   // webpack 复制文件和文件夹的插件
const HtmlWebpackPlugin = require('html-webpack-plugin')   // 自动生成 html 并且注入到 .html 文件中的插件
const ExtractTextPlugin = require('extract-text-webpack-plugin')   // 提取css的插件
const OptimizeCSSPlugin = require('optimize-css-assets-webpack-plugin')   // webpack 优化压缩和优化 css 的插件
const UglifyJsPlugin = require('uglifyjs-webpack-plugin')

const env = require('../config/prod.env')

const webpackConfig = merge(baseWebpackConfig, {
  module: {
    rules: utils.styleLoaders({
      sourceMap: config.build.productionSourceMap,   // 开启调试的模式。默认为true
      extract: true,
      usePostCSS: true
    })
  },
  devtool: config.build.productionSourceMap ? config.build.devtool : false,
  output: {
    path: config.build.assetsRoot,
    filename: utils.assetsPath('js/[name].[chunkhash].js'),
    chunkFilename: utils.assetsPath('js/[id].[chunkhash].js')
  },
  plugins: [
    new webpack.DefinePlugin({
      'process.env': env
    }),
    new UglifyJsPlugin({
      uglifyOptions: {
        compress: {   // 压缩
          warnings: false
        }
      },
      sourceMap: config.build.productionSourceMap,
      parallel: true
    }),
    new ExtractTextPlugin({   // 抽取文本,比如打包之后的index页面有style插入,就是这个插件抽取出来的,减少请求
      filename: utils.assetsPath('css/[name].[contenthash].css'),
      allChunks: true,
    }),
    new OptimizeCSSPlugin({   // 优化css的插件
      cssProcessorOptions: config.build.productionSourceMap
        ? { safe: true, map: { inline: false } }
        : { safe: true }
    }),
    new HtmlWebpackPlugin({   // html打包
      filename: config.build.index,
      template: 'index.html',
      inject: true,
      minify: {
        removeComments: true,   // 删除注释
        collapseWhitespace: true,   // 删除空格
        removeAttributeQuotes: true   // 删除属性的引号
      },
      chunksSortMode: 'dependency' // 模块排序,按照我们需要的顺序排序
    }),
    new webpack.HashedModuleIdsPlugin(),
    new webpack.optimize.ModuleConcatenationPlugin(),
    new webpack.optimize.CommonsChunkPlugin({   // 抽取公共的模块
      name: 'vendor',
      minChunks (module) {
        // any required modules inside node_modules are extracted to vendor
        return (
          module.resource &&
          /\.js$/.test(module.resource) &&
          module.resource.indexOf(
            path.join(__dirname, '../node_modules')
          ) === 0
        )
      }
    }),

    new webpack.optimize.CommonsChunkPlugin({
      name: 'manifest',
      minChunks: Infinity
    }),
    new webpack.optimize.CommonsChunkPlugin({
      name: 'app',
      async: 'vendor-async',
      children: true,
      minChunks: 3
    }),

    new CopyWebpackPlugin([   // 复制,比如打包完之后需要把打包的文件复制到dist里面
      {
        from: path.resolve(__dirname, '../static'),
        to: config.build.assetsSubDirectory,
        ignore: ['.*']
      }
    ])
  ]
})

if (config.build.productionGzip) {
  const CompressionWebpackPlugin = require('compression-webpack-plugin')
  webpackConfig.plugins.push(
    new CompressionWebpackPlugin({
      asset: '[path].gz[query]',
      algorithm: 'gzip',
      test: new RegExp(
        '\\.(' +
        config.build.productionGzipExtensions.join('|') +
        ')$'
      ),
      threshold: 10240,
      minRatio: 0.8
    })
  )
}
if (config.build.bundleAnalyzerReport) {
  const BundleAnalyzerPlugin = require('webpack-bundle-analyzer').BundleAnalyzerPlugin
  webpackConfig.plugins.push(new BundleAnalyzerPlugin())
}
module.exports = webpackConfig
8. config/dev.env.js#
// config内的文件是服务于build的
const merge = require('webpack-merge')   // webpack-merge提供了一个合并函数,它将数组和合并对象创建一个新对象,遇到函数,执行它们,将返回的值封装在函数中,这边将dev和prod进行合并
const prodEnv = require('./prod.env')
module.exports = merge(prodEnv, {
  NODE_ENV: '"development"'
})
9. config/index.js#
// 配置文件是用来定义开发环境和生产环境中所需要的参数
const path = require('path')
module.exports = {
  dev: {   // 开发环境下面的配置
    assetsSubDirectory: 'static',   // 子目录,一般存放css,js,image等文件
    assetsPublicPath: '/',   // 根目录
    proxyTable: {},   // 可利用该属性解决跨域的问题
    host: 'localhost', // 服务启动地址
    port: 8080, // 服务启动端口
    autoOpenBrowser: false,   // 是否自动打开浏览器
    errorOverlay: true,   // 浏览器错误提示
    notifyOnErrors: true,   // 跨平台错误提示
    poll: false,  // 使用文件系统(file system)获取文件改动的通知devServer.watchOptions
    devtool: 'cheap-module-eval-source-map',   // 增加调试,该属性为原始源代码(仅限行)不可在生产环境中使用
    cacheBusting: true,   // 使缓存失效
    cssSourceMap: true   // 代码压缩后进行调bug定位将非常困难,于是引入sourcemap记录压缩前后的位置信息记录,当产生错误时直接定位到未压缩前的位置
  },

  build: {    // 生产环境下面的配置
    index: path.resolve(__dirname, '../dist/index.html'),   // index编译后生成的位置和名字,根据需要改变后缀,比如index.php
    assetsRoot: path.resolve(__dirname, '../dist'),   // 编译后存放生成环境代码的位置
    assetsSubDirectory: 'public/vue-app/index',   // js,css,images等存放文件夹名
    assetsPublicPath: '/',   // 发布的根目录为Web容器绝对路径,修改为./则为相对路径
    productionSourceMap: true,
    devtool: '#source-map',
    productionGzip: false,   //unit的gzip命令用来压缩文件,gzip模式下需要压缩的文件的扩展名有js和css
    productionGzipExtensions: ['js', 'css'],
    bundleAnalyzerReport: process.env.npm_config_report
  }
}
10. config/prod.env.js#
// 发布时调用prod.env.js的生产环境配置
module.exports = {
  NODE_ENV: '"production"'
}
11. 配置代理解决跨域问题#
// 在 config/index.js 中的 proxyTable 配置
proxyTable: {
  '/':{
    target: "http://www.xxx.com",   // 要访问的地址
    changeOrigin: true   // 开启跨域
  }
}
// 配置理解为将访问 / 代理为 http://www.xxx.com 这样就不会触发跨域问题,即不会被浏览器拦截请求
// 在Vue的请求中要访问 http://www.xxx.com/testData 接口直接写成对 /testData 请求即可
// 通过 process.env.NODE_ENV 判断开发环境与生产环境区别请求 Url